JavaFXで進捗インジケータを表示する方法について記載します。
1. 進捗インジケータの作成方法
進捗インジケータを作成するには、ProgressIndicatorクラスを使用します。
構文
ProgressIndicator progInd1 = new ProgressIndicator();
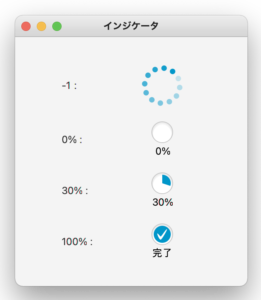
コンストラクタにdouble型の引数を1つ設定すると、進捗値を直接指定できます。
進捗の最大値は1.0です。
進捗は 0 〜 1.0 ですが、-1 を指定すると “処理開始前” のような状態を表現することが出来ます。
実行例

|
1 2 3 4 5 6 7 8 9 10 11 12 13 14 15 16 17 18 19 20 21 22 23 24 25 26 27 28 29 30 31 32 33 34 35 36 37 38 39 40 41 42 43 44 45 46 47 48 49 50 51 52 53 54 55 56 57 58 59 60 61 62 63 64 65 66 67 68 69 70 71 72 73 74 75 76 77 78 79 80 81 82 83 84 85 |
import javafx.application.Application; import javafx.geometry.Pos; import javafx.scene.Scene; import javafx.scene.control.Label; import javafx.scene.control.ProgressIndicator; import javafx.scene.layout.HBox; import javafx.scene.layout.VBox; import javafx.stage.Stage; public class Main extends Application { @Override public void start(Stage pStage) throws Exception { // インジケータ(-1) Label lblProg1 = new Label("-1:"); lblProg1.setPrefWidth(70); ProgressIndicator progInd1 = new ProgressIndicator(-1); progInd1.setPrefWidth(100); HBox hb1 = new HBox(); hb1.setPrefWidth(200); hb1.setSpacing(10); hb1.setAlignment(Pos.CENTER); hb1.getChildren().addAll( lblProg1, progInd1 ); // インジケータ(0%) Label lblProg2 = new Label("0%:"); lblProg2.setPrefWidth(70); ProgressIndicator progInd2 = new ProgressIndicator(0.0); progInd2.setPrefWidth(100); HBox hb2 = new HBox(); hb2.setPrefWidth(200); hb2.setSpacing(10); hb2.setAlignment(Pos.CENTER); hb2.getChildren().addAll( lblProg2, progInd2 ); // インジケータ(50%) Label lblProg3 = new Label("30%:"); lblProg3.setPrefWidth(70); ProgressIndicator progInd3 = new ProgressIndicator(0.3); progInd3.setPrefWidth(100); HBox hb3 = new HBox(); hb3.setPrefWidth(200); hb3.setSpacing(10); hb3.setAlignment(Pos.CENTER); hb3.getChildren().addAll( lblProg3, progInd3 ); // インジケータ(100%) Label lblProg4 = new Label("100%:"); lblProg4.setPrefWidth(70); ProgressIndicator progInd4 = new ProgressIndicator(1.0); progInd4.setPrefWidth(100); HBox hb4 = new HBox(); hb4.setPrefWidth(200); hb4.setSpacing(10); hb4.setAlignment(Pos.CENTER); hb4.getChildren().addAll( lblProg4, progInd4 ); // 配置 VBox vbRoot = new VBox(); vbRoot.setAlignment(Pos.CENTER); vbRoot.setSpacing(20); vbRoot.getChildren().addAll( hb1, hb2, hb3, hb4 ); pStage.setTitle("インジケータ"); pStage.setWidth(300); pStage.setHeight(350); pStage.setScene(new Scene(vbRoot)); pStage.show(); } public static void main(String[] args){ Application.launch(args); } } |
2. 進捗インジケータの更新方法
進捗を更新するには、setProgress メソッドを使用します。
構文
setProgress( double 更新後の値 );
次の例では、進捗が1秒毎に10%増加します。
|
1 2 3 4 5 6 7 8 9 10 11 12 13 14 15 16 17 18 19 20 21 22 23 24 25 26 27 28 29 30 31 32 33 34 35 36 37 38 39 40 41 42 43 44 45 46 47 48 49 50 51 52 53 54 55 56 57 58 59 60 61 62 63 64 65 66 67 |
import javafx.application.Application; import javafx.geometry.Pos; import javafx.scene.Scene; import javafx.scene.control.Label; import javafx.scene.control.ProgressIndicator; import javafx.scene.layout.HBox; import javafx.scene.layout.VBox; import javafx.stage.Stage; public class Main extends Application { ProgressIndicator progInd = new ProgressIndicator(0.0); @Override public void start(Stage pStage) throws Exception { Label lblProg1 = new Label("進捗:"); lblProg1.setPrefWidth(50); progInd.setPrefWidth(40); HBox hb1 = new HBox(); hb1.setPrefWidth(200); hb1.setSpacing(10); hb1.setAlignment(Pos.CENTER); hb1.getChildren().addAll( lblProg1, progInd ); // 配置 VBox vbRoot = new VBox(); vbRoot.setAlignment(Pos.CENTER); vbRoot.setSpacing(20); vbRoot.getChildren().addAll( hb1 ); pStage.setTitle("進捗インジケータ"); pStage.setWidth(180); pStage.setHeight(150); pStage.setScene(new Scene(vbRoot)); pStage.show(); // 別スレッドで進捗を更新 new Thread(){ public void run() { float progress = 0; while( progress < 100 ) { // 進捗を更新 progress += 10; progInd.setProgress(progress / 100); // 1秒スリープ try { Thread.sleep(1000); } catch (InterruptedException e) { e.printStackTrace(); } } } }.start(); } public static void main(String[] args){ Application.launch(args); } } |