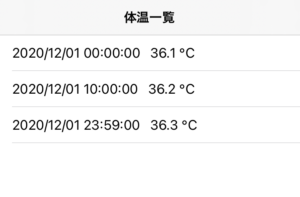
HealthKitの体温データを取得・表示する方法について記載します。
目次
体温データの取得方法
環境
・iOS14.4
・Xcode 12.4
デモ
最後に記載しているコードを実行すると以下のように表示されます。

ポイント1:権限のリクエスト
権限のリクエストには “HKQuantityTypeIdentifier.bodyTemperature” を指定します。
|
1 2 3 4 5 6 7 8 9 10 11 12 |
let healthStore = HKHealthStore() let readTypes = Set([ HKQuantityType.quantityType(forIdentifier: HKQuantityTypeIdentifier.bodyTemperature )! ]) healthStore.requestAuthorization(toShare: [], read: readTypes, completion: { success, error in if success == false { print("データにアクセスできません") return } // 体温データを取得 }) |
ポイント2:体温データの取得
権限のリクエストが成功した場合、体温データを取得することができます。
次のように、HKSampleQuery を生成し実行するとデータを取得できます。
|
1 2 3 4 5 6 7 8 9 10 11 12 13 |
// 体温データを取得 let query = HKSampleQuery(sampleType: HKQuantityType.quantityType(forIdentifier: HKQuantityTypeIdentifier.bodyTemperature)!, predicate: HKQuery.predicateForSamples(withStart: fromDate, end: toDate, options: []), limit: HKObjectQueryNoLimit, sortDescriptors: [NSSortDescriptor(key: HKSampleSortIdentifierEndDate, ascending: true)]){ (query, results, error) in guard error == nil else { print("error"); return } if let tmpResults = results as? [HKQuantitySample] { // 取得したデータを格納 } } healthStore.execute(query) |
サンプルコード
サンプルコードは次の構成になっています。
ContentView.swift
取得データをリストで表示します。
ContentViewModel で格納される dataSource配列 の値を参照してリストを生成します。
ContentViewModel.swift
体温データを取得します。
取得した体温データは、1データずつ ListRowItem構造体に格納し、dataSource配列に追加します。
ListRowItem.swift
取得した体温データを格納するための構造体です。
ContentView.swift
|
1 2 3 4 5 6 7 8 9 10 11 12 13 14 15 16 17 18 19 20 21 22 23 24 25 26 27 28 29 30 31 32 33 34 35 36 37 38 39 40 41 42 43 44 |
import SwiftUI struct ContentView: View { @ObservedObject var contentVM: ContentViewModel let dateformatter = DateFormatter() init(){ contentVM = ContentViewModel() dateformatter.timeZone = TimeZone(identifier: "Asia/Tokyo") dateformatter.locale = Locale(identifier: "ja_JP") dateformatter.dateFormat = "yyyy/MM/dd HH:mm:ss" // 体温データを取得する関数を呼ぶ(引数は期間) contentVM.get( fromDate: dateformatter.date(from: "2020/12/01 00:00:00")!, toDate: dateformatter.date(from: "2020/12/01 23:59:59")! ) } var body: some View { NavigationView { List { if contentVM.dataSource.count == 0 { Text("データがありません。") } else { ForEach( contentVM.dataSource ){ item in HStack{ Text(dateformatter.string(from: item.datetime)) Text(" \(item.bodyTemp) ℃") } } } }.navigationBarTitle(Text("体温一覧"), displayMode: .inline) } } } struct ContentView_Previews: PreviewProvider { static var previews: some View { ContentView() } } |
ContentViewModel.swift
|
1 2 3 4 5 6 7 8 9 10 11 12 13 14 15 16 17 18 19 20 21 22 23 24 25 26 27 28 29 30 31 32 33 34 35 36 37 38 39 40 41 42 43 44 45 46 47 48 49 50 |
import SwiftUI import Combine import HealthKit class ContentViewModel: ObservableObject, Identifiable { @Published var dataSource:[ListRowItem] = [] func get( fromDate: Date, toDate: Date) { let healthStore = HKHealthStore() let readTypes = Set([ HKQuantityType.quantityType(forIdentifier: HKQuantityTypeIdentifier.bodyTemperature )! ]) healthStore.requestAuthorization(toShare: [], read: readTypes, completion: { success, error in if success == false { print("データにアクセスできません") return } // 体温データを取得 let query = HKSampleQuery(sampleType: HKQuantityType.quantityType(forIdentifier: HKQuantityTypeIdentifier.bodyTemperature)!, predicate: HKQuery.predicateForSamples(withStart: fromDate, end: toDate, options: []), limit: HKObjectQueryNoLimit, sortDescriptors: [NSSortDescriptor(key: HKSampleSortIdentifierEndDate, ascending: true)]){ (query, results, error) in guard error == nil else { print("error"); return } if let tmpResults = results as? [HKQuantitySample] { // 取得したデータを1件ずつ ListRowItem 構造体に格納 // ListRowItemは、dataSource配列に追加します。ViewのListでは、この dataSource配列を参照して体温を表示します。 for item in tmpResults { let listItem = ListRowItem( id: item.uuid.uuidString, datetime: item.endDate, bodyTemp: String(item.quantity.doubleValue(for: HKUnit.degreeCelsius())) ) self.dataSource.append(listItem) } } } healthStore.execute(query) }) } } |
ListRowItem.swift
|
1 2 3 4 5 6 7 |
import SwiftUI struct ListRowItem: Identifiable { var id: String var datetime: Date var bodyTemp: String } |