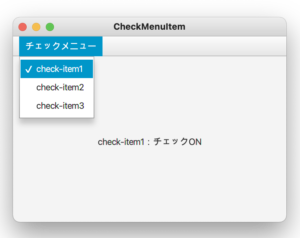
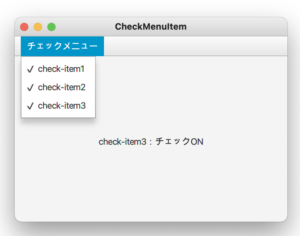
JavaFXでメニューに複数選択可能なアイテムを作成・イベントを登録する方法について記載します。
目次
複数選択可能なアイテムを作成・イベントを登録する方法
複数選択可能なアイテムを作成するには、CheckMenuItemクラス を使用します。
実行例


|
1 2 3 4 5 6 7 8 9 10 11 12 13 14 15 16 17 18 19 20 21 22 23 24 25 26 27 28 29 30 31 32 33 34 35 36 37 38 39 40 41 42 43 44 45 46 47 48 49 50 51 52 53 54 55 56 57 58 59 60 61 62 63 64 65 66 67 68 69 70 71 72 73 74 75 76 77 78 79 80 81 82 83 84 85 |
import javafx.application.Application; import javafx.event.ActionEvent; import javafx.event.EventHandler; import javafx.geometry.Pos; import javafx.scene.Scene; import javafx.scene.control.CheckMenuItem; import javafx.scene.control.Label; import javafx.scene.control.Menu; import javafx.scene.control.MenuBar; import javafx.scene.layout.VBox; import javafx.stage.Stage; public class Main extends Application { // イベント実行時のメッセージ表示用ラベル final Label lblMessage = new Label(); @Override public void start(Stage pStage) { /* メニュー -------------------- */ Menu menuA = new Menu("チェックメニュー"); CheckMenuItem menuAItem1 = new CheckMenuItem ("check-item1"); menuAItem1.setOnAction(new ItemEvent()); // イベントを設定 CheckMenuItem menuAItem2 = new CheckMenuItem ("check-item2"); menuAItem2.setOnAction(new ItemEvent()); // イベントを設定 CheckMenuItem menuAItem3 = new CheckMenuItem ("check-item3"); menuAItem3.setOnAction(new ItemEvent()); // イベントを設定 menuA.getItems().addAll( menuAItem1, menuAItem2, menuAItem3 ); /* ---------------------------- */ /* メニューバーを作成・メニューを追加 */ MenuBar menuBar = new MenuBar(); menuBar.getMenus().addAll( menuA ); /* ラベルの設定 */ lblMessage.setAlignment(Pos.CENTER); /* 配置 */ VBox vbMessage = new VBox(); vbMessage.setMinHeight(250); vbMessage.setAlignment(Pos.CENTER); vbMessage.getChildren().addAll(lblMessage); VBox root = new VBox(); root.getChildren().addAll(menuBar,vbMessage); pStage.setTitle("CheckMenuItem"); pStage.setWidth(400); pStage.setHeight(300); pStage.setScene(new Scene(root)); pStage.show(); } // EventHandlerインタフェースを実装したクラス class ItemEvent implements EventHandler<ActionEvent> { @Override public void handle(ActionEvent event) { // イベント発生元のオブジェクトを取得 CheckMenuItem mitem = (CheckMenuItem)event.getTarget(); // ラベルにアイテム名を表示 if( mitem.isSelected() ) { lblMessage.setText( mitem.getText() + ":チェックON" ); }else { lblMessage.setText( mitem.getText() + ":チェックOFF" ); } } } public static void main(String[] args){ Application.launch(args); } } |
1. 複数選択可能なアイテムの作成
複数選択可能なメニューを作成するには、CheckMenuItemクラスのインスタンスを作成します。
CheckMenuItem menuAItem1 = new CheckMenuItem (“ラベル名”);
2. アイテムにイベントを登録
アイテムクリック時のイベントを登録するには、setOnActionメソッドを使用します。
イベント用の独自クラスでは、EventHandler<ActionEvent>インタフェースを実装する必要があります。
|
1 2 3 4 5 6 7 8 9 10 11 12 13 14 15 16 17 18 |
// EventHandlerインタフェースを実装したクラス class ItemEvent implements EventHandler<ActionEvent> { @Override public void handle(ActionEvent event) { // イベント発生元のオブジェクトを取得 CheckMenuItem mitem = (CheckMenuItem)event.getTarget(); // ラベルにアイテム名を表示 if( mitem.isSelected() ) { lblMessage.setText( mitem.getText() + ":チェックON" ); }else { lblMessage.setText( mitem.getText() + ":チェックOFF" ); } } } |
3. その他のメニュー
複数選択可能なメニューの他に、選択不可なアイテムをメニューに追加することも出来ます。
詳細は以下のリンクを参照してください。