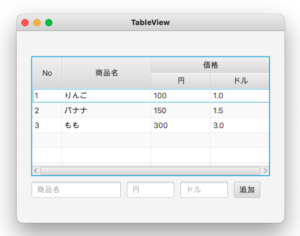
JavaFXでテーブル(TableView)を表示する方法について記載します。
目次
テーブルを表示する方法
テーブルを表示するには、TableViewクラス と 表示するデータを格納する独自クラスを使用します。
次の例では、データ格納用クラスとして商品クラス(Product)を使用しています。
実行例

Product.java(データ格納用の商品クラス)
|
1 2 3 4 5 6 7 8 9 10 11 12 13 14 15 16 17 18 19 20 21 22 23 24 25 26 27 28 29 30 31 32 33 34 35 36 37 38 39 40 41 42 43 44 |
public class Product { private int no; // 商品番号 private String name; // 商品名 private int priceJP; // 価格(JP) private double priceEN; // 価格(EN) public Product( int no, String name, int priceJP, double priceEN ) { this.no = no; this.name = name; this.priceJP = priceJP; this.priceEN = priceEN; } public void setNo( int no) { this.no = no; } public int getNo() { return no; } public void setName( String name ) { this.name = name; } public String getName() { return name; } public void setPriceJP( int priceJP ) { this.priceJP = priceJP; } public int getPriceJP() { return priceJP; } public void setPriceEN( double priceEN ) { this.priceEN = priceEN; } public double getPriceEN() { return priceEN; } } |
SampleTableView( TableViewを表示するクラス )
|
1 2 3 4 5 6 7 8 9 10 11 12 13 14 15 16 17 18 19 20 21 22 23 24 25 26 27 28 29 30 31 32 33 34 35 36 37 38 39 40 41 42 43 44 45 46 47 48 49 50 51 52 53 54 55 56 57 58 59 60 61 62 63 64 65 66 67 68 69 70 71 72 73 74 75 76 77 78 79 80 81 82 83 84 85 86 87 88 89 90 91 92 93 94 95 96 97 98 99 100 101 102 103 104 105 106 107 108 109 110 111 112 113 114 115 116 117 118 119 120 121 122 123 124 125 126 127 128 129 130 |
import javafx.application.Application; import javafx.collections.FXCollections; import javafx.collections.ObservableList; import javafx.event.ActionEvent; import javafx.geometry.Pos; import javafx.scene.Scene; import javafx.scene.control.Button; import javafx.scene.control.TableColumn; import javafx.scene.control.TableView; import javafx.scene.control.TextField; import javafx.scene.control.cell.PropertyValueFactory; import javafx.scene.layout.HBox; import javafx.scene.layout.VBox; import javafx.stage.Stage; public class SampleTableView extends Application { @Override public void start(Stage pStage) throws Exception { /* --------------------------- */ /* TableViewに表示するデータ */ /* --------------------------- */ ObservableList<Product> data = FXCollections.observableArrayList(); data.add(new Product(1, "りんご" , 100, 1.0)); data.add(new Product(2, "バナナ" , 150, 1.5)); data.add(new Product(3, "もも" , 300, 3.0)); /* --------------------------- */ /* TableViewを作成 */ /* --------------------------- */ TableView<Product> tableView = new TableView<>(); tableView.setMaxWidth(400); tableView.setMaxHeight(200); // TableViewの列を作成 TableColumn<Product, Integer> colNo = new TableColumn<>("No"); colNo.setMinWidth(50); TableColumn<Product, String> colName = new TableColumn<>("商品名"); colName.setMinWidth(150); colName.setSortable(false); // ソート不可 TableColumn<Product, Integer> colPrice = new TableColumn<>("価格"); colPrice.setMinWidth(200); TableColumn<Product, Integer> colPriceJP = new TableColumn<>("円"); colPriceJP.setMinWidth(100); TableColumn<Product, Double> colPriceEN = new TableColumn<>("ドル"); colPriceEN.setMinWidth(100); // 価格列に円・ドル列を追加 colPrice.getColumns().addAll(colPriceJP, colPriceEN); // 列と表示用のデータクラス(Productクラス)のフィールドを紐つける colNo.setCellValueFactory(new PropertyValueFactory<Product, Integer>("no")); colName.setCellValueFactory(new PropertyValueFactory<Product, String>("name")); colPriceJP.setCellValueFactory(new PropertyValueFactory<Product, Integer>("priceJP")); colPriceEN.setCellValueFactory(new PropertyValueFactory<Product, Double>("priceEN")); // TableViewに列を追加 tableView.getColumns().addAll(colNo, colName, colPrice); // 表示するデータを設定 tableView.itemsProperty().setValue(data); /* --------------------------- */ /* TableViewにデータを追加 */ /* --------------------------- */ // 商品名 TextField textAddName = new TextField(); textAddName.setMaxWidth(colName.getMinWidth()); textAddName.setPromptText(colName.getText()); // 価格(JP) TextField textAddPriceJP = new TextField(); textAddPriceJP.setMaxWidth(colPriceJP.getPrefWidth()); textAddPriceJP.setPromptText(colPriceJP.getText()); // 価格(EN) TextField textAddPriceEN = new TextField(); textAddPriceEN.setMaxWidth(colPriceEN.getPrefWidth()); textAddPriceEN.setPromptText(colPriceEN.getText()); // 追加ボタン Button btnAdd = new Button("追加"); btnAdd.setOnAction((ActionEvent e) -> { data.add(new Product( data.size()+1, // No textAddName.getText(), Integer.parseInt(textAddPriceJP.getText()), Double.parseDouble(textAddPriceEN.getText()))); // テキストエリアをクリア textAddName.clear(); textAddPriceJP.clear(); textAddPriceEN.clear(); }); /* --------------------------- */ /* 配置 */ /* --------------------------- */ // 追加エリアの配置 HBox hbAddElement = new HBox(); hbAddElement.setMaxWidth(400); hbAddElement.setMaxHeight(100); hbAddElement.setSpacing(10); hbAddElement.getChildren().addAll(textAddName, textAddPriceJP, textAddPriceEN, btnAdd); // TableView と 追加エリアを配置 VBox vbRoot = new VBox(); vbRoot.setAlignment(Pos.CENTER); vbRoot.setMinWidth(400); vbRoot.setSpacing(10); vbRoot.getChildren().addAll( tableView, hbAddElement ); pStage.setTitle("TableView"); pStage.setWidth(450); pStage.setHeight(350); pStage.setScene(new Scene(vbRoot)); pStage.show(); } public static void main(String[] args){ Application.launch(args); } } |
1. TableViewに表示するデータを準備する
TableViewに表示するデータは、独自のデータクラスとして作成します(今回の例では、Productクラスが該当します)。
また、作成したデータは ObservableListインタフェースの変数( 以下 data )に追加します。
ObservableListを使用すると、リストにデータ追加など変更があった際に、TableViewに即時に反映することができます。
|
1 2 3 4 |
ObservableList<Product> data = FXCollections.observableArrayList(); data.add(new Product(1, "りんご" , 100, 1.0)); data.add(new Product(2, "バナナ" , 150, 1.5)); data.add(new Product(3, "もも" , 300, 3.0)); |
2. TableViewに列を作成する
列を作成するには、TableColumn<S,T>クラスを使用します。
型パラメータ <S,T>
S:列に表示するデータクラスを指定します。( Productクラス )
T:列に表示するデータクラスのフィールドの型を指定します。
列名は TableColumnのコンストラクタで指定できます。
|
1 2 3 4 5 6 7 8 9 10 |
// TableViewの列を作成 TableColumn<Product, Integer> colNo = new TableColumn<>("No"); TableColumn<Product, String> colName = new TableColumn<>("商品名"); TableColumn<Product, Integer> colPrice = new TableColumn<>("価格"); TableColumn<Product, Integer> colPriceJP = new TableColumn<>("円"); TableColumn<Product, Double> colPriceEN = new TableColumn<>("ドル"); |
また、価格列のようにネストした列を作成することもできます。
親である価格列に、子の円・ドル列を追加するとネストした列を作成することができます。
|
1 2 |
// 価格列に円・ドル列を追加 colPrice.getColumns().addAll(colPriceJP, colPriceEN); |
3. 列のソートを不可にする
列は初期状態でソート可能になっています。
ソート不可にするには、TableColumnクラスの setSortableメソッド で false を指定します。
|
1 2 |
TableColumn<Product, String> colName = new TableColumn<>("商品名"); colName.setSortable(false); // ソート不可 |
4. TableViewに表示するデータを追加する
今回の例では、TableViewの下にデータ追加用のテキストエリアとボタンを用意しています。
ボタンがクリックされるとイベントが発火して、テキストエリアに入力した内容が TableViewに追加されます。
データの追加自体は、初期データの表示に使用した ObservableListインタフェースの変数 data に add メソッド を使用してデータを追加するだけで、TableViewの内容が更新されます。
|
1 2 3 4 5 6 7 |
Button btnAdd = new Button("追加"); btnAdd.setOnAction((ActionEvent e) -> { data.add(new Product( data.size()+1, // No textAddName.getText(), Integer.parseInt(textAddPriceJP.getText()), Double.parseDouble(textAddPriceEN.getText()))); |