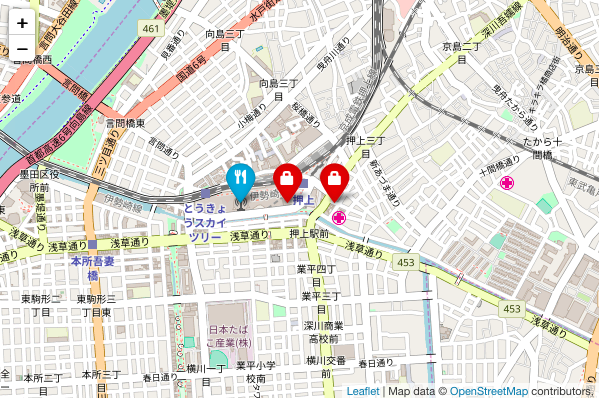
Leafletのプラグイン「Awesome-Markers」使用して、マーカーのアイコンを変更します。
今回は、「Font Awesome」「Glyphicons」のアイコンを使用します。
実装すると以下のようになります。

目次
1.全体のコード
|
1 2 3 4 5 6 7 8 9 10 11 12 13 14 15 16 17 18 19 20 21 22 23 24 25 26 27 28 29 30 31 32 33 34 35 36 37 38 39 40 41 42 43 44 45 46 47 48 49 50 51 52 53 54 55 56 57 58 59 60 61 62 63 64 65 66 67 |
<!DOCTYPE html> <html> <head> <title>Leaflet Plugin Awesome-Markers</title> <meta charset="utf-8"> <meta name="viewport" content="width=device-width, initial-scale=1.0"> <link rel="stylesheet" href="https://unpkg.com/leaflet@1.3.1/dist/leaflet.css" integrity="sha512-Rksm5RenBEKSKFjgI3a41vrjkw4EVPlJ3+OiI65vTjIdo9brlAacEuKOiQ5OFh7cOI1bkDwLqdLw3Zg0cRJAAQ==" crossorigin=""> <script src="https://unpkg.com/leaflet@1.3.1/dist/leaflet.js" integrity="sha512-/Nsx9X4HebavoBvEBuyp3I7od5tA0UzAxs+j83KgC8PU0kgB4XiK4Lfe4y4cgBtaRJQEIFCW+oC506aPT2L1zw==" crossorigin=""></script> <!-- plugin --> <link rel="stylesheet" href="css/leaflet.awesome-markers.css"> <script src="js/leaflet.awesome-markers.js"></script> <!-- Font Awesome --> <link rel="stylesheet" href="https://use.fontawesome.com/releases/v5.0.13/css/all.css" integrity="sha384-DNOHZ68U8hZfKXOrtjWvjxusGo9WQnrNx2sqG0tfsghAvtVlRW3tvkXWZh58N9jp" crossorigin="anonymous"> <!-- Glyphicons --> <link rel="stylesheet" href="https://maxcdn.bootstrapcdn.com/bootstrap/3.3.7/css/bootstrap.min.css" integrity="sha384-BVYiiSIFeK1dGmJRAkycuHAHRg32OmUcww7on3RYdg4Va+PmSTsz/K68vbdEjh4u" crossorigin="anonymous"> <!-- plugin --> <style type="text/css"> <!-- #mapid { height: 400px; width: 600px} .glyphicons-custom { margin-left: 1px; } --> </style> </head> <body> <div id="mapid"></div> <script> // Mapの基本設定 var map = L.map('mapid').setView([35.7102, 139.8132], 15); L.tileLayer('http://{s}.tile.osm.org/{z}/{x}/{y}.png', { maxZoom: 18, attribution: 'Map data © <a href="http://openstreetmap.org">OpenStreetMap</a> contributors, ' }).addTo(map); // Font Awesome fa-utensils options = { prefix: 'fa' ,icon: 'utensils' ,markerColor: 'blue' }; L.marker([35.7101,139.8107], {icon: L.AwesomeMarkers.icon(options)}).addTo(map).bindPopup("<p>Font Awesome</p><p>fa-utensils</p>"); // Glyphicons glyphicon-lock options = { prefix: 'glyphicon' ,icon: 'lock' ,markerColor: 'red' }; L.marker([35.7101,139.8127], { icon: L.AwesomeMarkers.icon(options)}).addTo(map).bindPopup("<p>Glyphicons</p><p>glyphicon-lock</p>"); // Glyphicons glyphicon-lock add css options = { prefix: 'glyphicon' ,icon: 'lock' ,markerColor: 'red' ,extraClasses: 'glyphicons-custom' }; L.marker([35.7101,139.8147], { icon: L.AwesomeMarkers.icon(options)}).addTo(map).bindPopup("<p>Glyphicons</p><p>glyphicon-lock add css</p>"); </script> </body> </html> |
2.解説
地図を描画するまでの解説は、leaflet入門1に記載しています。
2−1.プラグインの読み込み
Awesome-Markers の本体は GitHubからダウンロードできます。
また、今回使用する「Font Awesome」「Glyphicons」はCDNを使用してアイコンを読み込みますが、各サイトからダウンロードすることもできます。
|
1 2 3 4 5 6 7 8 |
<!-- plugin --> <link rel="stylesheet" href="css/leaflet.awesome-markers.css"> <script src="js/leaflet.awesome-markers.js"></script> <!-- Font Awesome --> <link rel="stylesheet" href="https://use.fontawesome.com/releases/v5.0.13/css/all.css" integrity="sha384-DNOHZ68U8hZfKXOrtjWvjxusGo9WQnrNx2sqG0tfsghAvtVlRW3tvkXWZh58N9jp" crossorigin="anonymous"> <!-- Glyphicons --> <link rel="stylesheet" href="https://maxcdn.bootstrapcdn.com/bootstrap/3.3.7/css/bootstrap.min.css" integrity="sha384-BVYiiSIFeK1dGmJRAkycuHAHRg32OmUcww7on3RYdg4Va+PmSTsz/K68vbdEjh4u" crossorigin="anonymous"> <!-- plugin --> |
2−2.Awesome-Markersの設定
L.markerのオプション「icon」に L.AwesomeMarkers.icon オブジェクトを指定します。
L.AwesomeMarkers.icon の引数に使用するアイコンを指定します。
|
1 2 3 4 5 6 |
options = { prefix: 'fa' ,icon: 'utensils' ,markerColor: 'blue' }; L.marker([35.7101,139.8107], {icon: L.AwesomeMarkers.icon(options)}).addTo(map).bindPopup("<p>Font Awesome</p><p>fa-utensils</p>"); |
Awesome-Markersのオプション
prefix:Font Awesomeの場合は「fa」を指定。Glyphiconsの場合は「glyphicon」を指定。
icon:アイコンを指定。(fa-utensilsの場合は、「utensils」を指定)
markerColor:マーカー色(’red’, ‘darkred’, ‘orange’, ‘green’, ‘darkgreen’, ‘blue’, ‘purple’, ‘darkpurple’, ‘cadetblue’)
2−3.CSSのカスタマイズ
Demoでは、中央にある赤いマーカーのアイコンが若干左側にズレています。
アイコンによりズレが生じることがあるので、その場合は「extraClasses」オプションを使用してスタイルを調整します。
|
1 2 3 4 5 6 7 |
options = { prefix: 'glyphicon' ,icon: 'lock' ,markerColor: 'red' ,extraClasses: 'glyphicons-custom' }; L.marker([35.7101,139.8147], { icon: L.AwesomeMarkers.icon(options)}).addTo(map).bindPopup("<p>Glyphicons</p><p>glyphicon-lock add css</p>"); |
この場合は、 extraClassesに glyphicons-custom クラスを設定しています。
glyphicons-custom クラス
|
1 2 3 |
i.glyphicons-custom { margin-left: 1px; } |
右に動かすため、左に 1pxマージンを設定しました。
Demoでは、一番右側にあるマーカーがこの設定をしたものになります。
3.まとめ
Awesome-Markers でマーカーのアイコンを変更しました。
アイコンによっては若干のズレがありますが、extraClasses オプションを使用すると簡単に修正することができます。
設定も少なめなので、使用しやすいと思います。
その他のマーカー系のおすすめプラグインは、こちらに記載しています。
Leaflet入門|おすすめプラグイン(マーカーのカスタマイズ)
マーカー系を含む全てのおすすめプラグインは、こちらに記載しています。
Leaflet入門|おすすめプラグイン
コメント
[…] Font Awesome を使ってマーカーを描画するには、プラグイン「Awesome-Markers」を使う方法も有りますが、単純に divIcon を使って描画することもできます。 […]