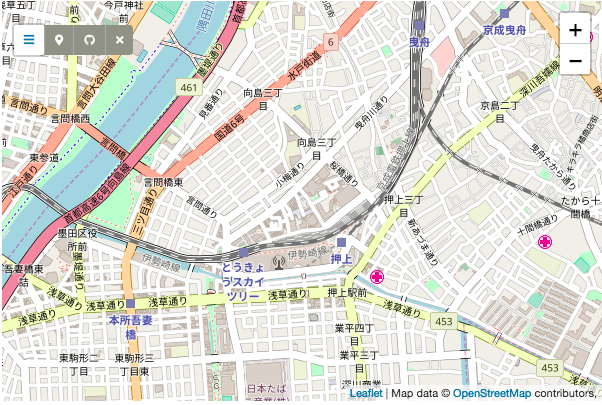
前回に引き続き、Leafletのプラグイン「toolbar」を使用して、地図にカスタマイズ可能なツールバーを表示します。
今回は、複数アイテムを表示するツールバーを実装します。
実装すると以下のようになります。

![]() このボタンをクリックすると、複数アイテム(サブツールバー)が展開されます。
このボタンをクリックすると、複数アイテム(サブツールバー)が展開されます。
目次
1.全体のコード
|
1 2 3 4 5 6 7 8 9 10 11 12 13 14 15 16 17 18 19 20 21 22 23 24 25 26 27 28 29 30 31 32 33 34 35 36 37 38 39 40 41 42 43 44 45 46 47 48 49 50 51 52 53 54 55 56 57 58 59 60 61 62 63 64 65 66 67 68 69 70 71 72 73 74 75 76 77 78 79 80 81 82 83 84 85 86 87 88 89 90 91 92 93 94 95 96 97 98 99 100 101 102 103 104 105 106 |
<!DOCTYPE html> <html> <head> <title>Leaflet Plugin toolbar</title> <meta charset="utf-8"> <meta name="viewport" content="width=device-width, initial-scale=1.0"> <link rel="stylesheet" href="https://unpkg.com/leaflet@1.3.1/dist/leaflet.css" integrity="sha512-Rksm5RenBEKSKFjgI3a41vrjkw4EVPlJ3+OiI65vTjIdo9brlAacEuKOiQ5OFh7cOI1bkDwLqdLw3Zg0cRJAAQ==" crossorigin=""> <script src="https://unpkg.com/leaflet@1.3.1/dist/leaflet.js" integrity="sha512-/Nsx9X4HebavoBvEBuyp3I7od5tA0UzAxs+j83KgC8PU0kgB4XiK4Lfe4y4cgBtaRJQEIFCW+oC506aPT2L1zw==" crossorigin=""></script> <!-- plugin --> <link rel="stylesheet" href="https://use.fontawesome.com/releases/v5.0.13/css/all.css" integrity="sha384-DNOHZ68U8hZfKXOrtjWvjxusGo9WQnrNx2sqG0tfsghAvtVlRW3tvkXWZh58N9jp" crossorigin="anonymous"> <link rel="stylesheet" href="css/leaflet.toolbar.css" /> <script src="js/leaflet.toolbar.js"></script> <!-- plugin --> <style type="text/css"> <!-- #mapid { height: 400px; width: 600px} --> </style> </head> <body> <div id="mapid"></div> <script> // Mapの基本設定 var map = L.map('mapid',{ center: [35.7122, 139.8117], zoom: 15, minZoom: 13, maxZoom: 16 }); L.tileLayer('http://{s}.tile.osm.org/{z}/{x}/{y}.png', { attribution: 'Map data © <a href="http://openstreetmap.org">OpenStreetMap</a> contributors, ' }).addTo(map); // sub-toolbar var marker; var TbSubAction = L.Toolbar2.Action.extend({ initialize: function(map, myAction) { this.map = map; this.myAction = myAction; L.Toolbar2.Action.prototype.initialize.call(this); }, addHooks: function() { this.myAction.disable(); } }); var TokyoTower = TbSubAction.extend({ options: { toolbarIcon: { html: '<i class="fas fa-map-marker-alt"></i>', tooltip: 'Tokyo Tower' } }, addHooks: function () { if(marker !== undefined){ map.removeLayer(marker); } var twLatlon = [35.658581,139.745433]; marker = new L.marker(twLatlon).addTo(map); map.setView(twLatlon, 19); TbSubAction.prototype.addHooks.call(this); } }); var GitHub = TbSubAction.extend({ options: { toolbarIcon: { html: '<i class="fab fa-github"></i>', tooltip: 'Open GitHub' } }, addHooks: function () { window.open('https://github.com/Leaflet/Leaflet.toolbar', '_blank'); TbSubAction.prototype.addHooks.call(this); } }); var Cancel = TbSubAction.extend({ options: { toolbarIcon: { html: '<i class="fas fa-times"></i>', tooltip: 'Cancel' } } }); var TbMainAction = L.Toolbar2.Action.extend({ options: { toolbarIcon: { className: 'fas fa-bars', }, subToolbar: new L.Toolbar2({ actions: [TokyoTower, GitHub, Cancel] }) } }); new L.Toolbar2.Control({ position: 'topleft', actions: [TbMainAction] }).addTo(map); map.zoomControl.setPosition('topright'); </script> </body> </html> |
2.解説
地図を描画するまでの解説は、leaflet入門1に記載しています。
2−1.ファイルの配置
Leaflet.toolbarの本体は GitHubからダウンロードできます。
GitHubから取得したcss・jsファイルを以下のように配置します。
index.html
css/leaflet.toolbar.css
js/leaflet.toolbar.js
2−2.プラグインの読み込み
2-1で配置した jsファイルを読み込みます。
また、今回はツールバーのアイコンに「Font Awesome」を使用するため、Font Awesome も読み込んでいます。
2−3.toolbarの設定
複数アイテム(サブツールバー)を使用する場合は、以下の流れで実装します。
<実装の流れ>
1.サブツールバー用のアクションオブジェクトを作成して、各アクションを登録。
2.メインツールバーに、サブツールバーを登録します。
|
1 2 3 4 5 6 7 8 9 10 11 12 13 14 15 16 17 18 19 20 21 22 23 24 25 26 27 28 29 30 31 32 33 34 35 36 37 38 39 40 41 42 43 44 45 46 47 48 49 50 51 52 53 54 55 56 57 58 59 60 61 62 63 64 |
// sub-toolbar var marker; var TbSubAction = L.Toolbar2.Action.extend({ initialize: function(map, myAction) { this.map = map; this.myAction = myAction; L.Toolbar2.Action.prototype.initialize.call(this); }, addHooks: function() { this.myAction.disable(); } }); var TokyoTower = TbSubAction.extend({ options: { toolbarIcon: { html: '<i class="fas fa-map-marker-alt"></i>', tooltip: 'Tokyo Tower' } }, addHooks: function () { if(marker !== undefined){ map.removeLayer(marker); } var twLatlon = [35.658581,139.745433]; marker = new L.marker(twLatlon).addTo(map); map.setView(twLatlon, 19); TbSubAction.prototype.addHooks.call(this); } }); var GitHub = TbSubAction.extend({ options: { toolbarIcon: { html: '<i class="fab fa-github"></i>', tooltip: 'Open GitHub' } }, addHooks: function () { window.open('https://github.com/Leaflet/Leaflet.toolbar', '_blank'); TbSubAction.prototype.addHooks.call(this); } }); var Cancel = TbSubAction.extend({ options: { toolbarIcon: { html: '<i class="fas fa-times"></i>', tooltip: 'Cancel' } } }); var TbMainAction = L.Toolbar2.Action.extend({ options: { toolbarIcon: { className: 'fas fa-bars', }, subToolbar: new L.Toolbar2({ actions: [TokyoTower, GitHub, Cancel] }) } }); new L.Toolbar2.Control({ position: 'topleft', actions: [TbMainAction] }).addTo(map); |
TbSubAction = L.Toolbar2.Action.extend({});
サブツールバー用に、L.Toolbar2.Actionオブジェクトを拡張します。
このオブジェクト使用して、サブツールバー用のアクションを定義します。
var TokyoTower = TbSubAction.extend({});
var GitHub = TbSubAction.extend({});
var Cancel = TbSubAction.extend({});
サブツールバーのアイテムごとにアクションを定義します。
var TbMainAction = L.Toolbar2.Action.extend({});
メインツールバーのオプション「subToolbar」にサブツールバーの各アクションを登録します。
これらの設定完了後に、L.Toolbar2.Control の actions に 拡張した「L.Toolbar2.Action」を指定します。
|
1 2 3 4 |
new L.Toolbar2.Control({ position: 'topleft', actions: [TbAction] }).addTo(map); |
これで、複数アイテムをもつツールバーを使用できます。
3.その他のおすすめプラグイン
その他のメニュー系のおすすめプラグインは、こちらに記載しています。
Leaflet入門|おすすめプラグイン(メニュー表示)
すべてのおすすめプラグインは、こちらに記載しています。
Leaflet入門|おすすめプラグイン