JavaFXでツールバーを作成・イベントを登録する方法について記載します。
ツールバーを作成・イベントを登録する方法
ツールバーを作成するには、ToolBarクラスを使用します。
また、イベントを登録するには、setOnActionメソッドを使用します。
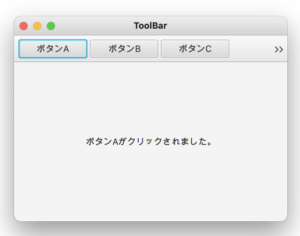
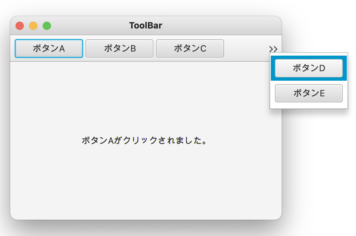
次の例では、ツールバーに5つのボタンを設定しています。
ボタンをクリックすると、ラベルにボタン名を表示します。
表示しきれないボタンは、 >> をクリックすると表示されます。
実行例


|
1 2 3 4 5 6 7 8 9 10 11 12 13 14 15 16 17 18 19 20 21 22 23 24 25 26 27 28 29 30 31 32 33 34 35 36 37 38 39 40 41 42 43 44 45 46 47 48 49 50 51 52 53 54 55 56 57 |
import javafx.application.Application; import javafx.event.ActionEvent; import javafx.event.EventHandler; import javafx.scene.Scene; import javafx.scene.control.Button; import javafx.scene.control.Label; import javafx.scene.control.ToolBar; import javafx.scene.layout.BorderPane; import javafx.stage.Stage; public class Main extends Application { /* ToolBarオブジェクトを作成 */ ToolBar toolBar= new ToolBar(); /* ボタンが押された際の出力先 */ Label lblOutput = new Label(); @Override public void start(Stage pStage) throws Exception { /* ツールバーにボタンを登録 */ final String[] btnNames = {"ボタンA","ボタンB","ボタンC","ボタンD","ボタンE"}; for( String btbName : btnNames ) { // ボタンを作成 Button btn = new Button(btbName); btn.setPrefWidth(100); btn.setOnAction( new EventHandler<ActionEvent>() { @Override public void handle(ActionEvent event) { lblOutput.setText( ((Button)event.getSource()).getText() + "がクリックされました。"); } }); // ツールバーに登録 toolBar.getItems().add(btn); } /* 配置 */ BorderPane borderPane = new BorderPane(); borderPane.setTop( toolBar ); borderPane.setCenter(lblOutput); pStage.setTitle("ToolBar"); pStage.setWidth(400); pStage.setHeight(300); pStage.setScene(new Scene(borderPane)); pStage.show(); } public static void main(String[] args){ Application.launch(args); } } |